How to Read a Chest X-Ray: Step-by-Step Beginner Guide
Chest X-ray interpretation is a fundamental clinical skill for medical students, interns, and doctors. Although it may appear difficult initially, using a systematic approach makes interpretation simple and reliable.How Doctors Read Chest X-Rays: Basic Concepts Explained
This article explains how to read a chest X-ray from the basics, step by step, in an easy-to-understand manner.

Why a Systematic Approach Is Important
One of the most common mistakes beginners make is jumping directly to diagnosis.
Chest X-ray reading should always follow a fixed sequence so that no finding is missed.
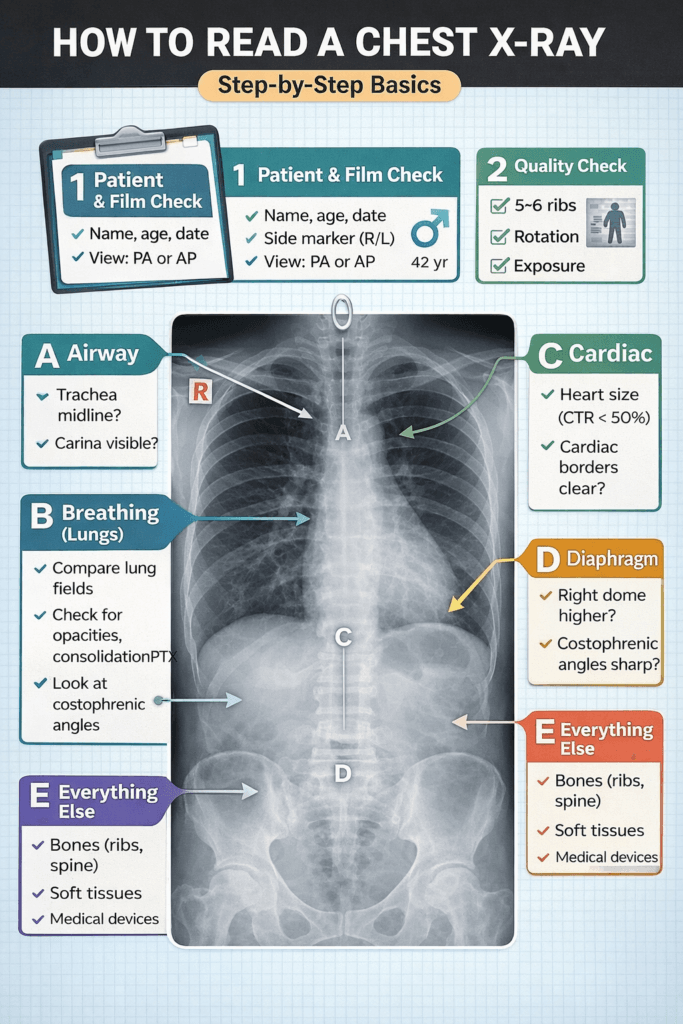
👉 The most reliable method is the ABCDE approach.
Step 1: Patient & Film Details
Before looking at anatomy, always confirm:
- Patient name and age
- Date of X-ray
- Right / Left side marker
- View: PA or AP
This prevents wrong-side and wrong-patient interpretation.
Step 2: Check the Quality of the X-Ray
Always assess quality before looking for disease.
✔ Inspiration
- At least 5–6 anterior ribs should be visible
✔ Rotation
- Medial ends of clavicles should be symmetrical
✔ Exposure
- Vertebral bodies should be just visible behind the heart shadow
Poor-quality X-rays can mimic pathology.
- Adequate vs poor inspiration chest X-ray
- Rotated chest X-ray example
Step 3: A – Airway
- Trachea should be in the midline
- Look for deviation or narrowing
- Identify the carina if visible
Tracheal deviation may suggest collapse, mass, or pleural disease.
- Normal trachea chest X-ray
- Tracheal deviation chest X-ray
Step 4: B – Breathing (Lung Fields)
Always compare both lungs side by side.
Look for:
- Consolidation
- Atelectasis (collapse)
- Pneumothorax
- Pleural effusion
- Blunting of costophrenic angles
Symmetry is the key to diagnosis.
- Normal lung fields chest X-ray
- Pleural effusion chest X-ray
- Pneumothorax chest X-ray
Step 5: C – Cardiac
- Assess heart size
- Cardiothoracic ratio < 50% in PA view
- Check cardiac borders
Loss of borders may indicate adjacent lung pathology (silhouette sign).
- Normal heart size chest X-ray
- Cardiomegaly chest X-ray
Step 6: D – Diaphragm
- Right hemidiaphragm is normally slightly higher
- Costophrenic angles should be sharp
- Look for free gas under diaphragm
- Normal diaphragm chest X-ray
- Blunted costophrenic angle chest X-ray
Step 7: E – Everything Else
Never forget to examine:
- Bones (ribs, clavicles, spine)
- Soft tissues
- Medical devices (tubes, lines, pacemakers)
- Rib fracture chest X-ray
- Chest X-ray with medical devices
Key Takeaways
- Always follow the ABCDE approach
- Check X-ray quality before diagnosing pathology
- Compare both sides carefully
- Regular practice improves accuracy
Personal Note to Readers
Due to some health issues, there was a short break in posting content.
Thank you for your patience and continued support.
I’m doing better now and will continue sharing clinical basics, X-ray interpretation, and exam-oriented medical education regularly.
Stay Connected
If you found this article helpful:
- Bookmark this page
- Share with friends and juniors
- Keep practicing
More educational content coming soon 🩺📚
Just tell me 😊
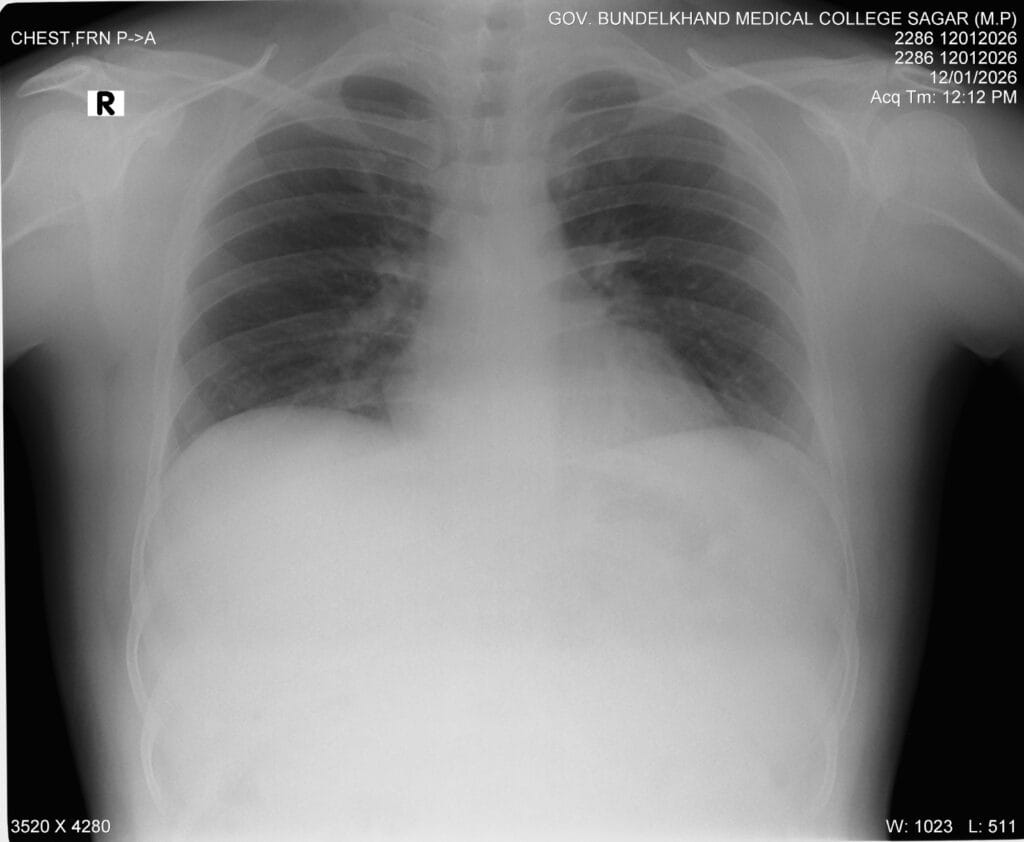
This my chest X ray PA view Read it Guys🙂
http://facebook.com/sciencegajab/